Hey, you're back! This is the second half of our PDF pattern tutorial. If you came in here from somewhere else, part 1 is here.
Quick recap & overview
You're halfway there! Most of today's work focuses on cleanup and preservation.Last time, we talked about:
- Selecting print options
- Calibrating and printing
- Laying out the pages
- Taping one piece
- Rough-cutting that piece
- Adding seam allowance
- Making up for sacrificed seam allowance (2-3 minutes per piece)
- Dealing with pointy-pointies (1 minute per piece)
- Bagging & tagging the pattern (5-10 minutes)
Ready? Yeah! Do it.
7. Making up for sacrificed seam allowance (2-3 min per piece)
Reminder: if your pattern already includes seam allowances, skip this section and the next section (7 and 8). Scoot on down to section 9 for some helpful hints about labeling your completed pattern with timely details.Now, on with the show for you seam-allowance-less folk. The scene? A forlorn, misshapen piece #9. It's making sad noises because it sacrificed some of its seam allowance so that piece #8 could have plenty.
Let's make things right for #9.
 |
| Piece #9 needs a little surgery. |
Perforate any edges you can
Using the threadless sewing machine method described in the last post, perforate as much of the edges as you can. |
| Piece #9, with partial perforation. |
 |
| Scrap paper finds a second life as an edge-restoration tool! |
 |
| Drawing the 5/8" seam allowance, guided by a ruler. The ruler? Why, it's a 5-in-1 Sliding Gauge from Nancy's Notions, one the most-used tools in my kit. |
 |
| Almost there: the piece has been marked with a carefully measured (or freehanded -- sh, don't tell) seam allowance on all sides. |
 |
| And, we're whole again. |
8. Dealing with pointy-pointies (1 minute per piece)
When meticulously perforating 5/8" from the pattern edge, you might come across some pointy pieces whose seam allowance extends into an extreme point. This can gobble up unnecessary extra fabric, and it can also be confusing when sewing the garment. Let's correct that. |
| This point is way too pointy as-is. |
 |
| See the black straight line? That's our 5/8" mark. |
 |
| Piece #8, you, sir, have been truncated! |
9. Bagging & tagging the pattern (5-10 minutes)
Once you've prepared a few PDF patterns, you'll develop a preferred method of storage and remembering info about the yardage, construction, etc. What I recommend below isn't the one universal answer to the storage question; it's just what I personally do.Storage
Many sewists store their patterns in manila envelopes, gallon zipper storage bags, or plastic sheet protectors in binders.
I use these:
That's right: comic book bags!
What an unexpected intersection of uber-geek passions: people who make their own clothes, and people who collect comic books. I guess it's not that uncommon. I mean: cosplay. Anyway, if you're not a comic book person, do take a moment to bask in the double shot of Sweet Nerd Thug Life.
Comic book bags are plentiful, cheap, and available everywhere. Here's an example on Amazon's site (not an affiliate link).
Be sure to ask for "current size" bags. There are lots of sizes -- Golden Age, Silver Age, Magazine, Treasury -- but you don't want those. You want "current." Why? Because these also fit the envelopes for Big 4 patterns (Butterick, McCall's, Simplicity, Vogue) and many others. Now you can bag your entire collection! It's good for patterns with a lot of bulky pieces that may be peeking out from the tattered edges of a poor over-worked original envelope.
Backing boards for comic book bags are sold separately. Personally, I don't use 'em with my patterns, but there's no good reason not to.
Here's another tip: when folding the pattern to fit into the bag, fold with, and perpendicular to, the grainlines when possible. No diagonal or random angle folding. I find this helps when laying the pieces on the fabric. It's easy to see where the grainlines go, either vertically or horizontally, from anywhere on the piece.
The "tagging" part
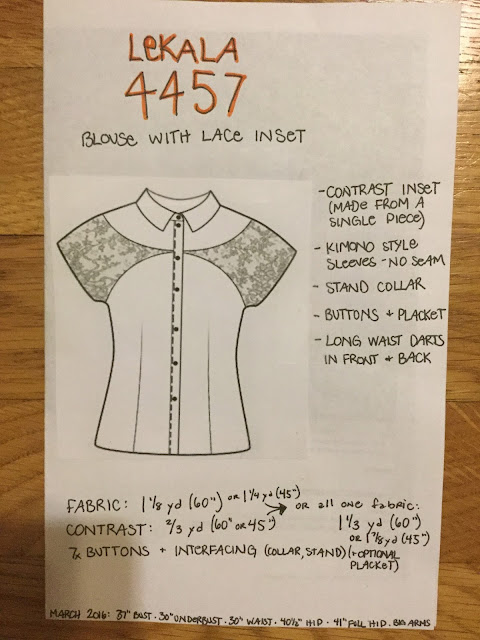
I have burned myself in the past by not writing down important info for future reference during sewing experiments. Predictably, I'm now a big advocate for over-cataloging everything.So, when possible, I create a little cover sheet for my pattern.
 |
| Capture the details of your PDF patterns as you go. |
- Pattern brand and number
- Line drawing or other art, for quick visual identification
- Design features and construction details, such as neckline, sleeve type, shaping darts, skirt style
- Yardage requirements for all fabrics, including interfacing
- Other supplies, like buttons or boning
- Date first created, especially if there were any fitting adjustments (FBA, increased hip width, etc) so that if my shape changes in the future, I'll know which patterns need to be updated
- Made-to-order measurements, if applicable, for patterns such as Lekala which are custom generated from the user's individual measurements
In conclusion
Wow, you did it! Here's a handsome award you can print out and display in your bathroom, bedroom, budoir.So now's the time I ask if you have questions. Did you get stuck at any point? Was anything unclear? Ask in the comments.
Also, show off your beautifully designed pattern cover sheets in the comments! We all wanna see and get inspired.
Until next time, friends!


No comments:
Post a Comment